Mastering-Tutorial
This short Tutorial is about "MASTERING" within Cubase and with its effects.
- MASTERING
- The Steps of Mastering (possibility)
- MASTERING with other VSTs
- 2nd & 3rd Example
What happens during the process of "mastering"?
Let us listen to the sound before and after mastering:
Without Mastering
The original: Live-Recording in an old wooden room, very (too) dry...
With Mastering
Which jobs or tasks have to be done between the "not -" and the "mastered piece"?
The mastered piece is...
- louder
- crispier
- more punchy
- in a way more detailed...
Further: Even it sounds louder as it does before...
MASTERING doesn't mean: Let's make a piece as loud as possible.
If that would be so you could take a good limiter or maximizer - and here we go.
So what are the steps for producing a final piece which doesn't lost its dynamics, but nevertheless, which got loudness and some punchy "crisp"?
Click on "The Steps of Mastering" above...
This is a possible "Mastering Chain". Nevertheless, take into account that some mastering processes do not need a lot of effects.
1. Adjust the Signal
2. Clean frequencies
3. Compress the music for gluing the mix (ratio 1.5)
4. Add a further compressor for more power(maybe not necessary)
5. Add some reverb over all (maybe not necessary)
6. Check the spectrum
7. control the stereo width (maybe not necessary)
8. Maximize/Limit the signal (maybe not necessary)
9. Check the final signal (Correlation)
10. Dither (when convert the signal down to 16Bit)
Master an audio signal also means...
- to remove DC
- to adjust the balance L<>R
- to remove frequencies below 20Hz,
- to check/correct the correlation
- to check/correct the mid/side signals
- ...
Attention: If you plan to give your final mix to a studio for doing the "Mastering" - don't do any of the steps below. Just be careful that you have no clips with your final mix...
The Steps of Mastering within Cubase - and within the output channel
a possible "Chain of Mastering"
1. Make sure that you have enough headroom

... above the highest peaks for doing all the next steps.
You reach it either with the "input - trimmer" or
make sure that you get low levels from all the channels.
2. Search for bad frequencies
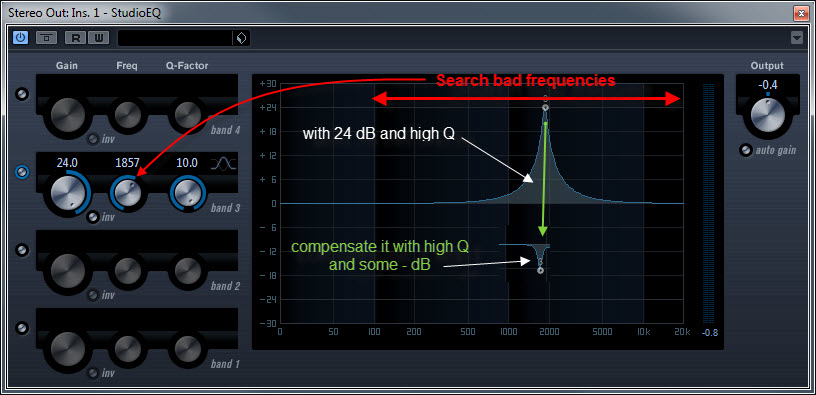
Scan the frequency range as you can see (image on the right).
Maybe you can find some frequencies which will get an extreme resonance.
But attention: Make sure that it isn't a xth-harmony of a current tone of the music.
Bad frequencies are those which are tending to get in resonance...
3. Reduce the gain of...
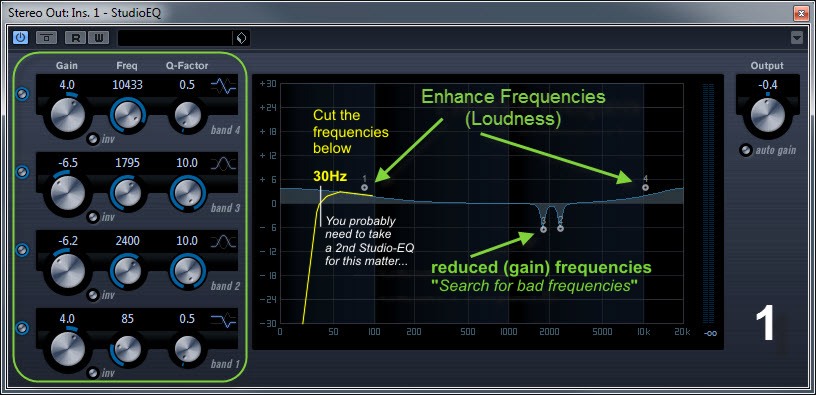
... the bad frequencies (3, 2 in our example) and enhance perhaps the low and high frequencies (loudness).
Install an EQ for cutting frequencies below 25Hz with a high pass filter (not shown with the current EQ on the image).
So you remove all the "high energy waves", rumbles and the DC faults.
4. Add a compressor
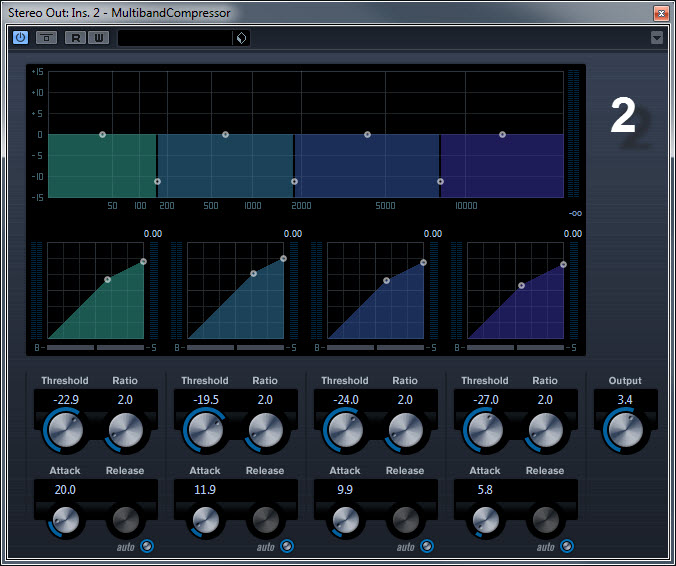
...or a multiband compressor.
If you do not have experiences how to adjust a multiband compressor
use a Cubase preset such as "Ballad Master", "Rockmaster" ...
...or take the parameters from my setup "neutral as possible" (see the image).
5. Add a "reverb over all"
TIP
Maybe you used Reverence (or another Convolution Reverb) within the mix for getting several depths. If yes, take here a Randomizing Algorithmic Reverb as we get with Roomworks for example (see here as well Reverb PlugIns Tail Comparison).
6. Check the spectrum over all
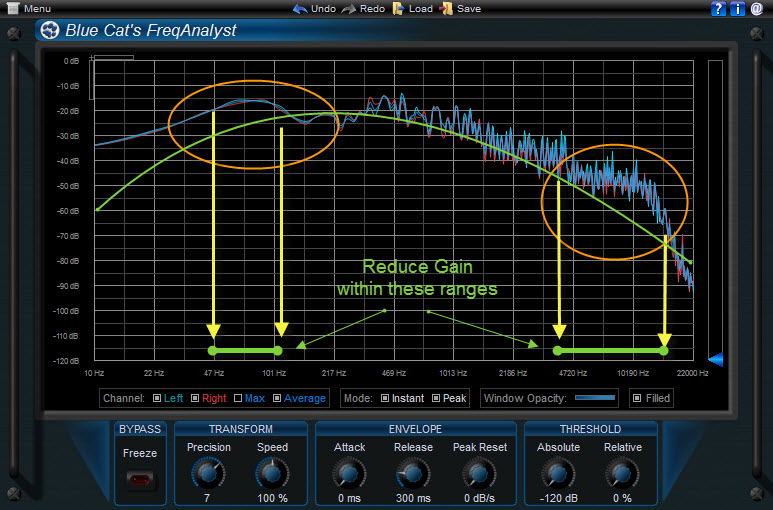
Check the spectrum for example with the free "Blue Cat's FreqAnalyst"
http://www.bluecataudio.com/Products/Product_FreqAnalyst/
Observe the diagram whether it has deviations from the ideal curve (green) or not.
(The Multiband Compressor did too much perhaps...)
Our example shows two main increases. (too much bass, too shiny)
We should use now another EQ for decrease the certain frequency ranges for a nice final output signal.
Another free Analyser: http://www.voxengo.com/product/span/ Spectrum Analyser
Also 64Bit, with K-Metering, Correlation,...
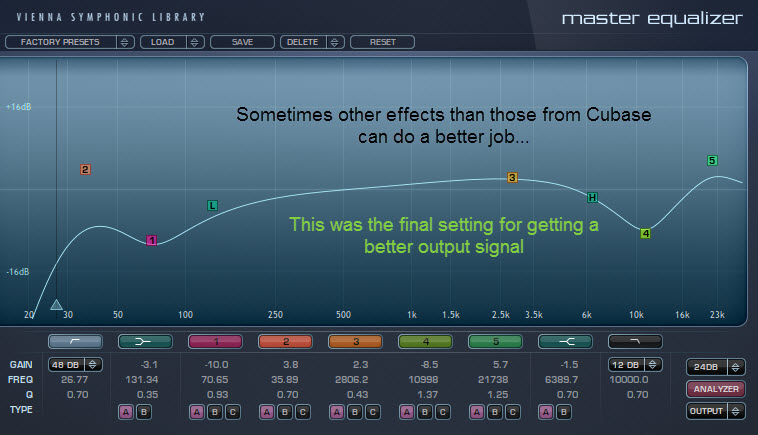
Sometimes the effects of other companies can do a job better than the effects of Cubase.
This here is a matter for another EQ. We should select a very good EQ and if possible one with a "Linear-Phase".
When we did a good job we will reach a curve as shown below.
Of course we always can and should use our ears as well.
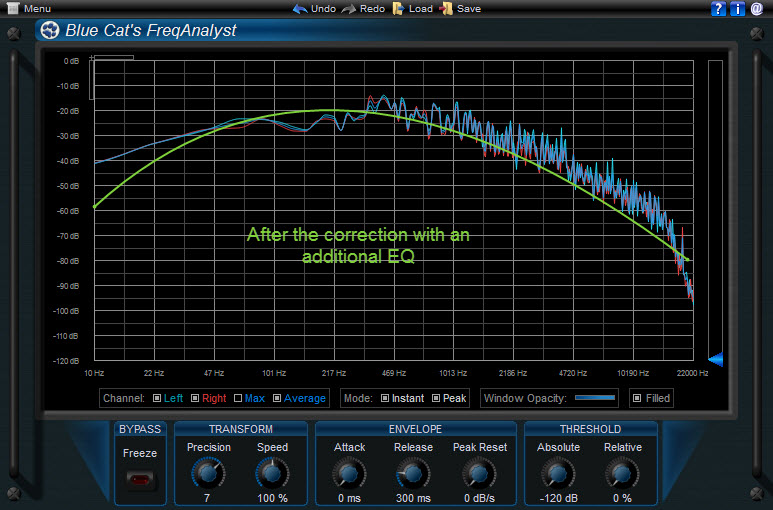
With classical instruments orchestras we should get curves as the one we have here.
I don't have really experiences with Rock, Hip Hop, Dance and other styles of music.
So maybe we should get other curves there...
7. Insert a Stereo Enhancer
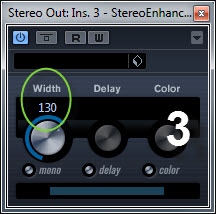
You can get more width with the stereo signal.
But attention: Check always the correlation within the "Multiscope" (9.).
The marker should be always between 0 (zero) and +1.
8a. Insert a Maximizer
For getting even more punch can insert a "Maximizer" here.
Some music needs the maximum power we can get.
Unfortunately, you lose the whole dynamic this way.
So it is you decision "loud or more dynamic range".
It depends on the music style.
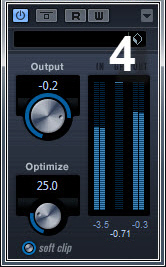
8b. Insert a Limiter
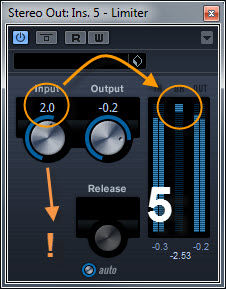
For cutting the highest peaks we use a limiter.
Tip for classical music:
Make sure that the limiter only has to limit some loud parts of your piece.
(Just limit the highest peaks)
Set the "Output" to -0.2dB!
The output signal doesn't reach the absolute 0dB end this way.
The reason is: Some old CD-Players can't play the 0dB without distortion.
9. Insert the Multi-Scope
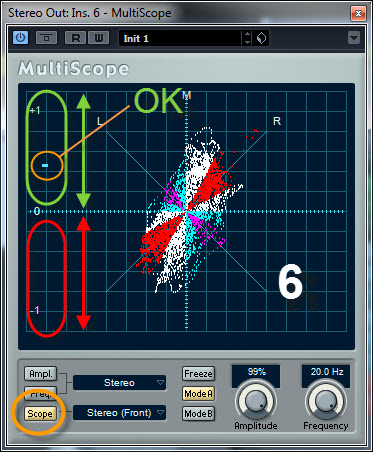
Check the signals - specially the value "Correlation".
The marker should be mainly between 0 and +1.
This means: Your final Audio-File will be "mono-compatible".
If the signal most of the time is between -1 and 0 switch the phase "on" (top of the channel) and observe the correlation again.
A better solution is to search the "source" of the bad phase.
Often we have audio effects which are producing those bad "phases" such as reverb, chorus, stereo widener, etc.
Sometimes we also got bad recorded samples from ensembles (Horns, Strings etc.)
10. Insert a Dither
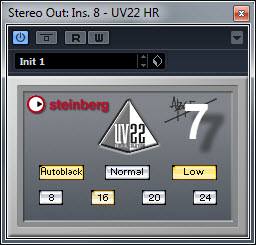
When you are going to reduce the signal now from 24 Bit to 16 Bit (CD) or from even higher Bit-resolutions down to 16Bit use the dither effect. Read >>>here more about dithering.
Additional Info
Even if we already use 16Bit audio-files for example Cubase and other DAWs are calculating all our effects with a solution of 32Bit (or more). So use a Dither for the really final export in any case.
Also: Often Effects add some noise (vintage simulation). Then a Dither is not really necessary!
The order of the PlugIns isn't fix.
I used the following order for the next two pieces:
Kaufmann: Sample Carnival without Mastering
Kaufmann: Sample Carnival with Mastering
Visit this Website:
http://www.musik-produktion-createc.ch/content/tonstudio/mastering/
... and listen for further examples.
Thanks
© Copyright, Createc Beat Kaufmann, 2004 - 2025