How to use the Vienna Instrument?
From a MIDI-file to a VSL-Track

Dear VSL-Vienna Instrument-user
The following pictures, texts and sound examples will show you the way.
Have fun!
Yours
Beat Kaufmann
This tutorial is optimized for the new Vienna Instruments (VI).
VI means in general Vienna Instrument > In this tutorial VI is also the abbreviation for (Solo) VIOLIN. Sorry for this coincidence. But I'm sure you will get it... ;-)
Contents
The Midi-file
All the next steps are based on this Midi-file: Midi tempo 120 Velocity 64 . Please load it down and import it into your sequencer. It contains just the notes you see in the score below.
The tempo is: 120 (over all) / The velocity: 64 (all notes)


|
|
| Tempo = 120 | Velocity = 64 |
or click miditut_midifile.mp3 [242 KB]
| VELOCITY - Information about VSL-Samples | |
|---|---|
|
Basic-Set-notes do have normally 2 Velocity Layers (VelLay): V1 (mf) Velocity 0 - 88 V2 (ff) Velocity 89 - 127 |
Short and long notes do have up to 4 Velocity Layers: V1 (p) Velocity 0 - 55 V2 (mf) Velocity 56 - 88 V3 (f) Velocity 89 - 108 V4 (ff) Velocity 109 - 127 |
|
Dyn-/Trem-/Trills- and Pizz- notes do have 1-2-(3) Velocity Layers: 1 Velocity Layer: V1 Velocity 0-127 2 Velocity Layers: V1 (mf) 0-88, V2 (f) 89-127 3 Velocity Layers: V1 0-55/ V2 56-108/ V3 109-127 |
This is always the "Note-Velocity" itself! (Do not mix it up with midi-controller 7) |
Step 1: Adjust tempo / Velocity 88 over all?

I adjust at this time the coarse tempo values. I also set the velocity level for all notes on level 88 (one count before VSL's-ff). This is comfortable later on. Then you have only to increase the velocity +1 step and you will have the forte sound. (Click on the picture if you want to enlarge it)
...or click miditut_step1.mp3 [303 KB]
Step 2: Loading first sample articulation

Now you are prepared to load the first samples with your sampler. I have decided to make a track for the solo violin. Let us take for the first impression the Sustain-Sample. Load up this sample articulation in the Vienna instrument. Check the picture beside how to do it.
You will find it at 01 Violin solo/ 01 SHORT + LONG NOTES
"1a" VI_sus_Vib (A1 = Matrix Cell)
> Click miditut_step2_rs.mp3 [294 KB]
(with Release Sample)
> Click miditut_step2_nors.mp3 [294 KB]
(without Release Sample)
1. Example: with release-sample / 2. Example: without release
A flat and "samply" sound, isn't it? And in reality? No tone sounds like the next one. If you want to come closer to this natural sound you need to have hundreds of variations. This isn’t possible. But VSL offers plenty of different tone variations. So if possible use short notes such as staccato, portato short (0,3s), portato medium (0,5s), portato long (1s -2s)
It depends of course on your library content how much different articulations you can use.

Here we go. Let's take for the first short notes "stac-samples".
But first of all we have to insert more Matrizes. Let's expand it for a total of 8 Matrizes "C0" >>> "G#0".
"C0" means that the Key C0 on the Keyboard will switch to Matrix "C0".
So we will be able to load 8 different articulations.
Each of those articulations is placed in the first matrix cell "A1".
Step 3: Setting keyswitches
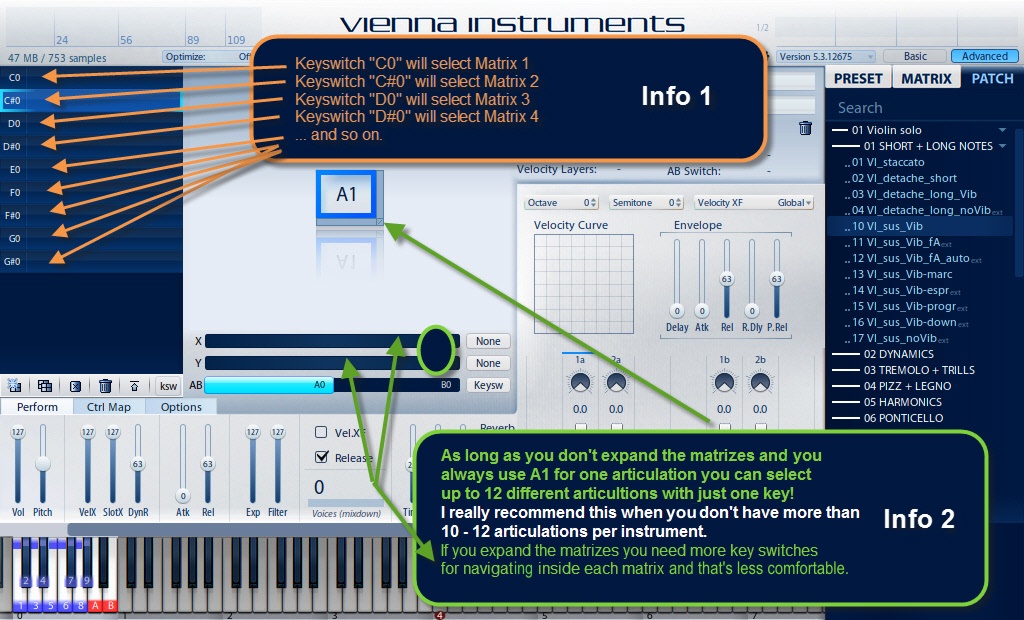
Now we need to set-up "key switches".
These are necessary if you want to switch between the 8 Matrizes which you just created.
If you have assigned them to the corresponding matrix you can press the Keys (Key switches) C0 - C#0 - D0 - D#0 - E0 - F0 - F#0 - G0 >>> and the Matrizes within VI should change now.
ATTENTION 1:
Always choose key switches outside of the range of the used instrument. The violins lowest note is G3 and our highest keyswitch is G1 > so there is no problem.
Info: Keyswitches are "ordinary notes" (outside the instrument's range). So they also can be recorded while playing the melody with the keyboard or by writing it in the Midi - List Editor or by drawing in the Note Editor or... It's up to you to find the best solution for your situation.
ATTENTION 2:
Sometimes the key name "C0" differs between DAW and VI. So if you should press "C0" for the VI you need to press "C-1" in Cubase.
Within Logic you can adapt this matter - I believe.
ATTENTION 3:
You could switch between the matrizes with "midi program changes" as well!
In this case I'm going to show the way the "Key Switches".

Load now the staccato samples please.
You will find them at 01 Violin solo/ 01 SHORT + LONG NOTES
"C0" VI_sus_Vib
"C#0" VI_staccato
Now you should be able to switch between VI_sus_Vib and VI_staccato by setting key switches in your sequencer or by pressing (live) your keyboard.
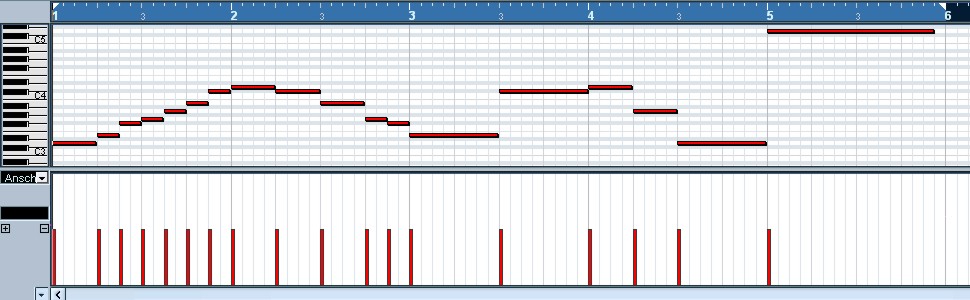
The picture below (Piano Editor) shows the inserted key switches.
Attention: I recommend to place the keyswitches always a little bit before you need the new articulation.

Please check with the picture above how to set keyswitches now in your sequencer.
C0 = VI_sus_Vib (C-1 in Cubase)
C#0 = VI_staccato (C#-1 in Cubase)
D0 = not used until now
D#0 = not used until now
E 0 = .....
Click miditut_step3.mp3 [294 KB]
or start the player.
Step 4: Loading more short articulations

As you can see in the score we take for the note d in the second bar the detache_long-sample (0,5s). It has a nice sound.
You will also see it later on in a better way (when this sample will be played with ff). You have to load up the detache-short–sample (0,3s) too.
You find both sample-types under 01 Violin solo/ 01 SHORT + LONG NOTES as well.

"C0" VI_sus_Vib
"C#0" VI_staccato
"D0" VI_detache_short (0,3s)*
"D#0" VI_detache_long_Vib (0,5s)*
* Use staccato as well with the SE Library
Click miditut_step4.mp3 [294 KB]
or start the player.
Step 5: Loading special samples

To get the real violin sound we have now to load up more articulatons. Most time it is a good thing to combine the sfz-sample with stac-samples.
We will play in our example the very first note with sfz. They are integrated in a sample package called "...dyn...Xs". The end of our track we play with two different diminuendo-samples: 1,5s and 3s. Unfortunately you get the "dyn" articulations only with VI's Extended Library.
Tip: Longer dim-samples are also good for longer notes because they have in its first second a “sweller”. This fact takes a very natural course with the velocity. “Dims” with long notes are nearly a must in baroque music. > The dim-time should be longer then the tone-time in this case.
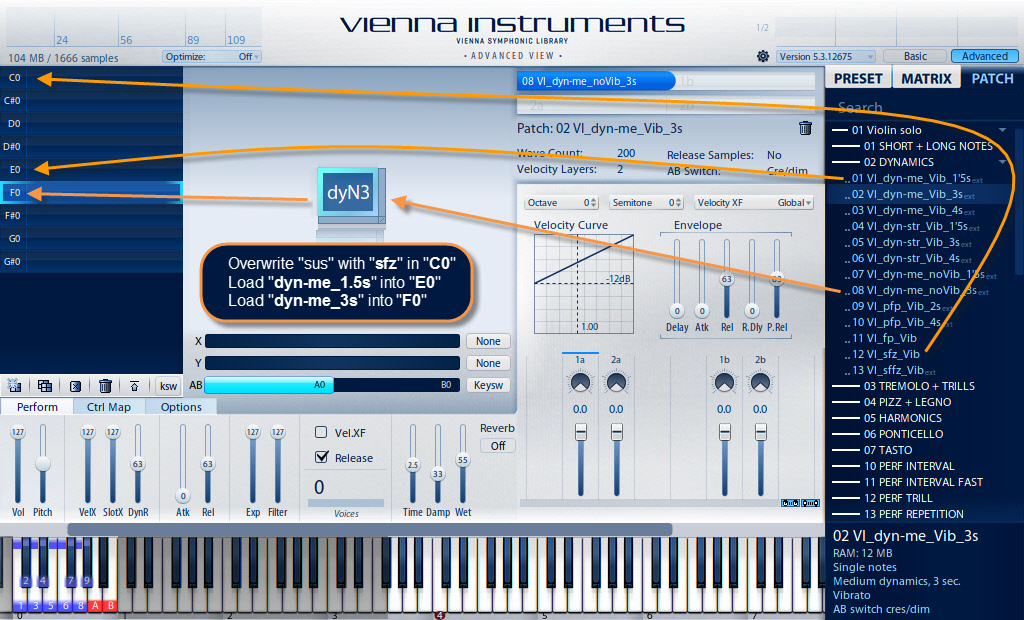
Please load now the dynamic-samples at 01 Violin solo/02 DYNAMICS:
"C0" VI_sfz_Vib >> please overwrite the "VI_sus_Vib" because of a better starting sound
"C#0" VI_staccato
"D0" VI_detache_short
"D#0" VI_detache_long_Vib
"E0" VI_dyn_me_Vib_1,5s (only Extended Library)*
"F0" VI_dyn_me_noVib_3s (only Extended Library)*
* You could use "sus" with the SE-Library even if it isn't e real replacement


Dynamic-files contain sometimes two articulations. In case of the "dyn-me-files" we have the VI to tell whether we want to have a crescendo or a diminuendo.
For this matter we set at A/B-Switch in our case on "Key Switch". Either we take the proposed key switches or we set them.
Attention: It is not allowed to set already used key switches. If you do that you give the VI two orders at once...
A0 = crescendo in VI (A-1 in Cubase)
B0 = diminuendo in VI (B-1 in Cubase)
Set the key switches as it is shown in the upper picture (leave it). If all the settings are correct it should sound this way...
Click miditut_step5.mp3 [305 KB]
or start the player.
Step 6: Loading performance samples

We will come one more step closer to the reality with this "Performance Samples".
Attention: They use a lot more of RAM space than "Single-Note-Samples".
Load now please VI-perf-legato and VI perf-portamento.
You will find them at:
01 Violin solo/10 PERF INTERVAL/01 VI_perf-legato and
01 Violin solo/10 PERF INTERVAL/01 VI_perf-portamento
* use legato as well with the SE-Library

"C0" VI_sfz_Vib
"C#0" VI_staccato
"D0" VI_detache_short
"D#0" VI_detache_long_Vib
"E0" VI_dyn_me_Vib_1,5s (only Extended Library)
"F0" VI_dyn_me_noVib_3s (only Extended Library)
"F#0" VI_perf-legato
"G0" VI_perf-portamento *
* use legato as well with the SE-Library

Click miditut_step6a.mp3 [305 KB]
or start the player.
(This sample is already "velocity-adjusted" > no more level 64. Please read more about this subject in Step 7 .)
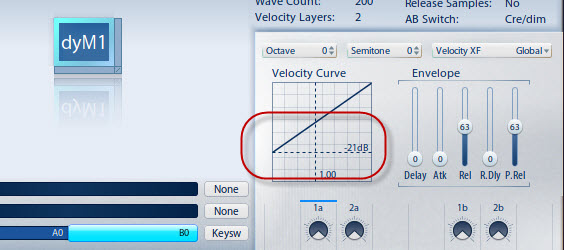
If the dyn-articulations don't follow the midi-velocity enough you need to increase the midi sensitivity by lowering the Velocity Curve!
Within the upper audio example the velocity Curve is at -12dB (default).
With the following audio example (step6b) the value is -21dB. See the picture on the right.
Now the diminuendos sound more natural in the context.
Click miditut_step6b.mp3 [305 KB]
or start the player.
Step 7: Adjust the velocities / Save the setup

A very important thing is the adjusting of the velocities. There are no rules for the velocity "calibration". On the one hand you have the composer’s fortes and pianos and on the other hand you have the limitations of the samples. So try, turn, trim, increase, decrease, check, change... until you have the best result(s) so that the notes fit to each other.
You only can do this work by hearing the result.
See the result by clicking on the image on the right...
Click miditut_step7.mp3 [327 KB]
or start the player.
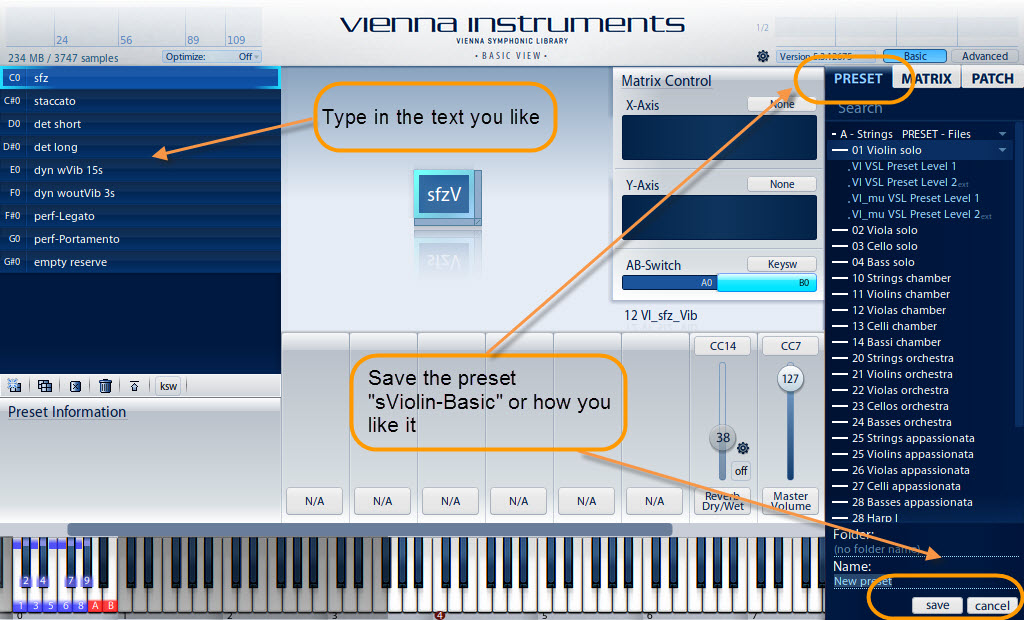
"How to save the whole VI as a "Preset"?
Checkout the image on the right.
Step 8: Adding a room effect
Our solo violin sounds even more realistic in a natural room. If you have no Reverb please check up this home page:
SIR http://www.knufinke.de/sir (free VST-Convolution-PlugIn)
And now... The solo violin with some reverb
Click miditut_step8.mp3 [327 KB]
or start the player.
VI_Basic_Presets
I'm working with so called "BASIC PRESETS"
Once you have worked out the key switches in the way you like it (as we've done it above) you could save all the instruments in the same way.
This would make you able to exchange instrument at any time because the key switches work then for all of them.
If you want to know more about VI-BASIC-PRESETS and their advantages please use this link.
Top
Last word
This completes the short basic introduction in "How to use the Vienna Instrument with Midi".
Without batting an eyelid you will use 10 and more different samples for creating a real sound of an instrument.
That's not a problem for the VI. It is able to load 12 x 12 articulations per Matrix.
Further you are able to load 12 such Matrices in total.
So theoretically you can load up to 1728 articulations. The limitation is more given by your RAM-configuration.
Attention: 1 VI is able to play 1 articulation - even if you have load 1728 of them.
Single notes, such as sus, dim, staccato, detache etc. are polyphon playable.
Performance articulations, such as legato, portamento, zigane etc. are monophonic articulations with the common VI.
VIPro is able to play performance-articulations in a polyphonic way.
And now I wish you successful sessions with this powerful instrument(s)
Yours
Beat Kaufmann
Download Tutorial [503 KB] (pdf)
Back > Top